The Golden Mean and Calipers
Finding the perfect width for your quilt’s borders and sashing is easy if you use the Golden Mean. If you aren’t familiar with this term, it refers to a sweet spot in the middle, between 2 extremes. It divides a space so that one side is a bit larger than the other in a way that is harmonious and pleasing to the eye. Also referred to as the golden ratio, it occurs often in nature. To find this division of space, I love to use my Golden Mean Calipers. As the calipers open and close, the center point, always indicates the Golden Mean, and two harmonious inner spaces.

large and small Golden Mean Calipers
These calipers are available in the Creativity Tools section of my web store.
Perfect Borders Using the Golden Mean

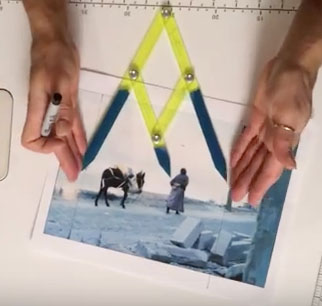
Measure the width of your block.
This tool is also useful when adding borders to a traditional block quilt. One method is to start with the blocks themselves. Place the outer points of the calipers at the edges of the blocks. This will give you two new measurements that will be in harmony with the blocks.
Use the larger measurement for the total width of the border.

Create a single border matching the wider measurement of the calipers.
Divide this area further by placing the outer points of the calipers on the edges of the border area. This will indicate pleasing widths for an inner and outer border.

Divide the border area using the calipers.

Create harmonious smaller borders.
All measurements indicate finished sizes, so don’t forget to add seam allowances.
Perfect Sashing Using the Golden Mean
Use the golden mean to determine the width of sashing, as well as borders. The smaller inner border width, determined above, is also the perfect width for sashing. Sashing is used between and around all of the blocks, and it serves to set the blocks apart for the purpose of highlighting each as an individual unit.
Borders surround the grid of blocks and visually hold them together. Sashing adds to the visual weight of the grid layout, and creates the need for a larger border to maintain balance. Combine the width of the sashing and the single border to create a harmonious, larger, outer border, as shown below.

Measure sashing & border

Calipers indicate width of additional border
Borders and Sashing for a Predetermined Quilt Size
Sometimes, a specific finished size is necessary and the process described above will exceed those limits. In this case, if you know how wide the full border needs to be, but you want to break it down into multiple borders, the golden mean is a good way to do that. Open the calipers to the full border width, and use the two inner measurements for multiple border widths.
No calipers – No Problem
You can also determine harmonious measurements without the calipers by using the magic number: 1.6. Take any measurement. Determine a larger size by multiplying by 1.6
Example: 5 x 1.6 = 8
Conversely, divide by 1.6 to find a smaller measurement.
Example: 5 ÷ 1.6 = 3.125 (Round down to 3 inches)
Learn More in My Color & Composition Class
 Interested in learning more? Every month I lead a Color and Composition class where we explore a color scheme, color concept, and a composition concept. We meet online the 4th Saturday of every month 1:00-3:00 PM MDT. To join us, sign up through the Rocky Mountain Quilt Museum.
Subscribe to this blog for future summary updates on topics covered in the Color & Composition class.