Tag Archives: fiber art

Judging a Book by its Cover

Panning CoverAfter working on my new book all summer: sewing samples, photographing the stages, and explaining it all with text, it came time to design the cover.  I thought that using a photo of my work, “Panning for Gold” would be great since it has won a couple of awards this year.  That’s when I discovered the benefits of having a great editor and designer looking out for me.

It was pointed out to me that the cover I proposed was drab in color and portrayed an old, poor man, working hard in an icy mountain stream–No joy there!!  I was also forced to consider how the cover would look on a website where it would appear only a few inches high.  Details are lost, and colors blend together.  A cover has to work at full size and in miniature.

Another consideration is how the book will be displayed in a shop.  Often books are stacked on shelves that allow only the top 2 inches of the book to be seen.  This means that those top 2 inches are prime real-estate.

Finally, I didn’t want to add a subtitle.  Sometimes those seem to go on forever.  I like short and sweet.  Again, my team showed the value of using this opportunity to further define my book topic for those who are not familiar with my work.

I can’t say enough good things about Janice Brewster, editor, and Karen Sulmonetti, designer.  They are The Creative Girlfriends.  If you are thinking about writing a book, click on their link and get started.

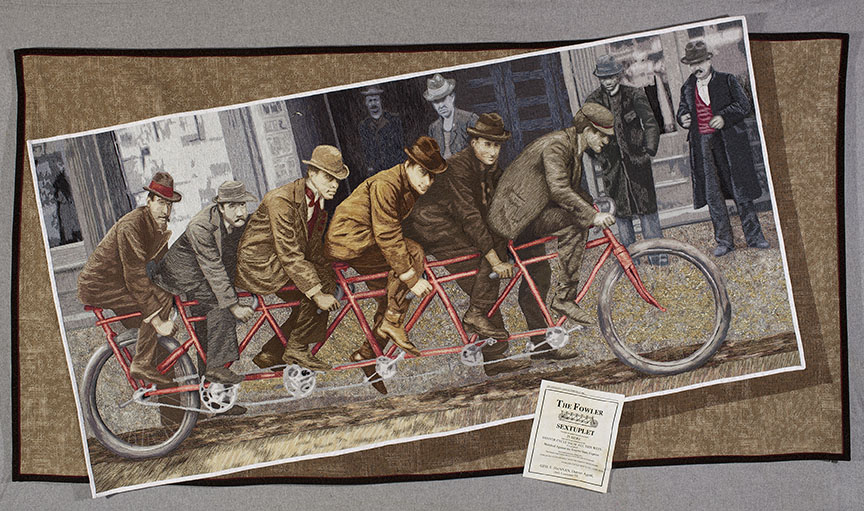
With all of this in mind, it was back to the drawing board, and sewing machine, for a new and improved cover.  Here is what we came up with:

Share

Festival in UK

LOOK! A quilt and a prize.

LOOK! A quilt and a prize.

I’ve just returned from the Festival of Quilts inBirmingham, England.  It was fabulous.  Some of you know that attended last year and arrived expecting to see my quilt, Turkish Bread Boys on display, only to discover that it never arrived.  Well, this year it did and the Boys took second place in the Pictorial Quilt category.

Once again, I traveled by myself and that enabled me to stumble into some great experiences.  The first night in my hotel I met two quilters from Ireland who knew me from The Quilt Show website.  Rita and Janet were warm and friendly and had a great enthusiasm for quilting and more than a few questions related to the topic “What is up with those Americans”.  They led me to other TQS people who invited me to dinner.  This was a group of people from 5-6 different countries who had only known each other through a

quilt chat room until they came together at the festival.  We spent the evening telling stories, laughing, and  sharing ideas.  I have to ask, “How often does something like that happen?”  Not often enough in my life.

The TQS gang

The TQS gang

Share

Making Faces With My Friends

I’ve been away from the blog for a while, but that doesn’t mean that I haven’t been

writing. In fact, my fingers are nearly worn down to the first knuckle due to non-

Debbie Fishell worked from a baby picture of her husband.

Debbie Fishell worked from a baby picture of her husband.

stop typing these months of June and July. Among the various writing projects, the most exciting is that I’m working on a book titled The Thread Painted Portrait. It presents my techniques for creating a fused fabric foundation covered with threadwork. Now that the manuscript is being edited, I have a chance to stop and reflect on the publishing process and share some of it with you. This is just an introduction to be followed by several installments about the trials and celebrations I experience in writing this book. Check in and follow my progress, and look for the book hot of the press by the end of October.

First, Why write a book? I’ve beenteaching my portrait quilt workshop for several years now where I teach the fused foundation technique. It’s a real kick to see faces emerge from the fabric, and

Judy Armstrong added a pop of color.

Judy Armstrong added a pop of color.

an even bigger kick watching others get excited when they produce a portrait. Take a look at some of the portrait quilts that students have done.  Everyone adds their own special design element to their piece.

If you’ve seen my work, you know that this is only the beginning for me. After creating the fused fabric face, I spend hours covering it up with miles of thread. Invariably, in a workshop someone will ask me to teach them to thread paint the face. Being able to do something well requires a certain level of understanding and skill development. However, the ability to teach that technique to othersrequires an even greater level of skill and understanding.

Judy Liebo combined two very special images.

Judy Liebo combined two very special images.

It is only recently that I felt that I understood my process well enough to adequately share it with others.

Laurie Carson with her best friend.

Laurie Carson with her best friend.

Share

Getting Rid of Those Unwanted Bumps

Lumps in the back tire

Lumps in the back tire

The recently finished Bike Boys crossed the finish line with some unwanted bumps and lumps. This was most prominent in the area around the bike tires.  Sewing in a circular motion, and some significant corrective stitching caused some stretching that made that part of the quilt pop up.  I needed a way to block the quilt.  Because of it’s size, roughly 4×6 feet, simply pressing it wasn’t sufficient.

Once again, it was an artist friend that came to the rescue.  Peggy, my dog sitter, and an accomplished  water color artist told me how she used to block her water color paintings.  She placed them face down on a piece of glass, sprayed the back with water, placed a second piece of glass over the top, weighted it down and waited for 2 or more weeks.

I was able to create a similar set up, large enough for my quilt, using a couple of large tables at the school where I teach.  Once school was out for the summer, I found an out of the way room with 2 large conference tables. I cleaned the tables thoroughly.  With a bit of help, I turned one table over and stacked it on the other with the quilt in between.  I did give the quilt a spritzing and a little extra moisture in the trouble spots, and walked away for 2 weeks.

I checked back in this week and, to my amazement, it worked!.  The piece will need to be handled with some care so as not to stretch it out of shape again.

Bike Boys

Bike Boys


In the future, I think I can repeat this process using the hardwood floor in my living room and a piece of Plexiglass.

Now, it’s time for me to go out for a run and try to get rid of some of my own unwanted lumps and bumps.

Share

Bike Boys Cross the Finish Line

Bike Boys

Finally, it’s done!  I finished the stitching and added a little extra to give context and a resting space.  I was a bit nervous about adding a neutral background around the Boys, but, in the end, felt that the panel was just too intense and needed some space for the eye to rest. I struggled with how much space to add.  If you add too much space, you lose  intensity.  However, I also know that if it isn’t enough, then the piece actually looks wimpy and weak.  I turned the original panel askew to keep the added space small but powerful.  I think that turning the boys uphill makes them stronger.  Imagine the same panel turned downhill–they would appear to be coasters.  This is better.

I shared the piece with some friends and colleagues.  What was most interesting to them was the historical context of the image.  The inspiration for this piece was a photo found in the archives of the History Colorado Museum in Denver.   The Fowler Sextuplet was the first bicycle built for 6.  It was brought to the Denver Cycle Show in 1896 to race against the Empire State Express.  I’ve spent a good bit of time researching, but can’t find any information as to who won the race.  I hope this doesn’t mean they all crashed and burned.

The Bike Boys paused for a photo that submits them to a fiber art competition in Houston.  Let’s keep our collective fingers crossed that they have a more notable finish in that competition.

Share

Bike Boys and Road Trip

This has been a BIG week.  I traveled to Paducah this week with my parents, Willis and Dixie, for the AQS Quilt Week festivities.  I received a first prize in the Small Wall Quilt, Pictorial category for my “Panning for Gold,” and met lots of wonderful quilters.  We were actually in Paducah for just over 24 hours, but, thanks to Dixie on a motorized scooter, we barely stopped moving.

Lunch on the Curb

Lea with parents in Paducah

In spite of the out of town time, I still made progress on thread painting the Bike Boys.  I now have the first 2 guys stitched.  With a win at Paducah, I’m energized to get this piece done in time to submit to the show in Houston in November.

This is the front man.  I’m not totally satisfied with his face.  I’might give him a mustache.

Here is the second man.  I rather like him, but I will need to do some additional shaping of the hat after I stitch the background figure. Below, see the 2 guys together.

Share

Adam and the Paperectomy

Finally, it’s time to begin work on the people in this composition.  I’m going back to the beginning, the first image that I fused with

The vest in cool reds

fabric, the man in the background on far right.  Since he is first, I’m calling him Adam.  Because he is a less significant figure, I’m using him as a warm-up to the big buys on the bike.  I started with the vest, using cooler reds than in the bike frame so as to push it into the background,

I move next to the face, again selecting a group of cool grays that will fall back from the warmer tones I will use on the actual bike boys.

The face emerges

Finally, I work on the coat.  This is where I find that the dimensions on the arm are messed up.  I will try to redefine them with thread by making the upper arm wider, and shaving off some of the lower edge of the fore sleeve with darker thread that will put it into shadow sooner.  Check back later to see how this works out.

Got to fix that sleeve

Stitching people is a bit intense. when I have only a short period of time to work and don’t want to dive into the details, I move to the background and begin filling it in.  I discover that this too, presents problems.  While stitching, I begin to hear a clicking noise.  Investigation reveals that I didn’t remove a piece of backing paper before assembling this portion of the work.  I need to go in and get it. I declare the need for a “paperectomy” and prepare for surgery.  See this delicate operation below.  The important thing is to make incisions through the layers at various places.  Once done, I can stitch over the area and seal up the cuts that I’ve made.  The patient will survive with no permanent scars.

Horizontal cut through tulle

Scissors under tulle make vertical cut through fabric.

Loosen and remove paper.

Share

Bike Tire

This week, I’ve managed to finish the bike frame and the tires.  I’ve taken a series of photos of the back tire to show how I progress from the lightest threads to the darkest, and then add accents (bits of black) and highlights (bits of white).  Aside from the white and black, I used 4 values of thread, but chose 2 threads for each value.  One was slightly warmer and the other cooler.  I’ve set up my threads and a reference photo on the laptop.  Now, I’m ready to get started.

I work my way around the tire using both threads of each value, but use more of the warmer thread in the back, lit part of the tire, and more of the cooler thread in the front, or shaded side of the tire. Here is how it went.

scissors point to trouble spot.

On may way around I discover trouble: the lines of the tire don’t line up well as they appear between the parts of the frame.  I’ll have to keep this in mind and make some corrections with the darker threads.

I use the mid-value threads to blend the edges of the tire trouble spots with the background.

scissors point to blending away of bad edges

I use the darker threads to redefine the edges so that they line up.

edges redefined

Now, I consult my photo from several weeks back showing the strings.  I use this to select key spots to add white and black to create highlights and accents at just the right spots. (see blog from 3/1/2014).

A mere four hours later, and it’s all done. Hmmm, what to tackle next…


Share

Stitching the Frame

I’ve stitched the mid and foreground sidewalk and street.  This involved a lot of circular stitching.  I like to use variegated threads for this kind of stitching because they blend easily and create variation on the surface.  

After that I started stitching the bike frame.  This takes a bit more attention.  I chose 10 threads total that range from very light to very dark,  I put down the middle value thread first and then worked to the lightest thread.  Now, I need to go back and put down the darker threads, and do some fine tuning.  A key factor will be breaking up the highlights and the accents so that they come and go.

Share

Bike Boys Ride a New Machine

After a week of taking care of other responsibilities, I’m back to work on the Bike Boys.  Today I loaded them on the long arm quilting machine.  This was no small task since pieces are still coming loose.  

In addition to the backing and batting, I’ve inserted a layer of painters canvas under the Bike Boys appliqué.  This will help to stabilize the piece as it is stitched.  A layer of fine tulle netting goes over the top.  This will keep all of those raw edges from getting fuzzy and will help to hold the small bits in place as I stitch.  Because of the difficulties with the fusible, I did not wrap the the appliqué layer around the bars of the frame.  I was afraid it would all come apart.  

The most time-consuming part of the process is getting rid of all those little bits of thread and fluff.  I have to carefully run a lint roller over the surface, and then over the tulle.  The tulle seems to have a lot of static electricity so things keep jumping back on to it.  

Finally, it is all pinned in place and lint free.  I’ll wrap up this work session by doing some outline stitching around various spots, just enough to hold all the layers in place as I roll the composition back and forth when the real thread-painting gets started tomorrow.

All goes well, until I stand back to appreciate my progress and what do I spot??  Two little what spots of lint trapped under the tulle.  

AAUURGGH!!

Share